
 Free
FreeYY-Toolkit
Win10/Win11 one-click maintenance: updates, antivirus, repair
YY-Toolkit combines Windows Update, Defender, OneDrive, sharing, and system repair for Win10/Win11. Each section includes guides and manual steps. Free from YouYue Technology.
Windows only
20 interface languages
After installing, switch from Interface language in the top-right corner. Includes:
- 繁體中文
- 简体中文
- English (US)
- Norsk
- Dansk
- العربية
- 日本語
- 한국어
- Deutsch
- Français
- Español
- Italiano
- Português (Brasil)
- Nederlands
- Polski
- Čeština
- Română
- Русский
- Svenska
- Suomi
Current system status
Open the app and use red/green labels to see update, antivirus, OneDrive, network sharing, and password expiry at a glance—switch to the tab you need to make changes.
- Windows Update
- Antivirus
- OneDrive
- Network sharing
- Password never expires
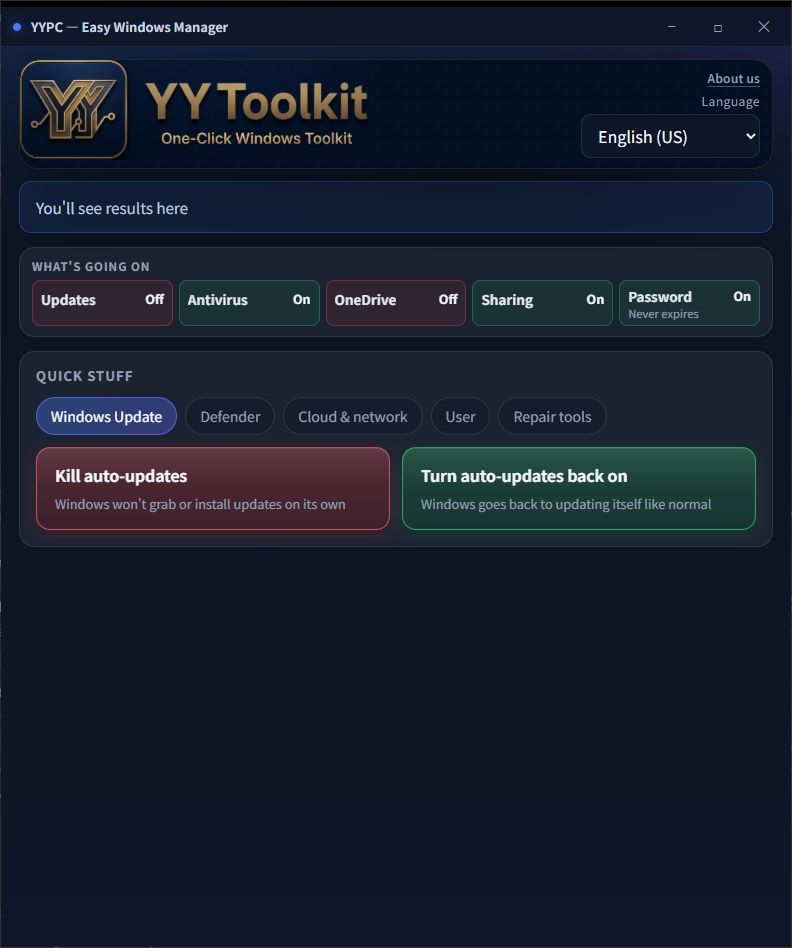
Disable Windows auto update with one click (Win10/Win11)
Feature guideNo Control Panel, services, or Registry Editor—in the Windows Update tab, press Stop auto update to fully block downloads, installs, and background schedules. Restore anytime you need.
What it can do
Stop auto update
Fully stops Windows Update downloads, installs, background schedules, and related services/policies—not just a short pause, and helps prevent the Medic service from turning updates back on.
Restore auto update
Turn automatic updates back on when you need security patches.
Use cases
- Avoid surprise reboots while rushing a proposal or editing video.
- After setup or repair, finish configuration before deciding when to enable updates again.
- Pause updates while testing software so your environment stays unchanged.
How do I permanently disable Windows Update on Win11/Win10?
With YY-Toolkit: open the app → Windows Update tab → press Stop auto update for a full shutdown. Without this app, follow these manual steps:
Common manual approaches below—screens may differ slightly by Windows version
- [Short term only] Settings → Windows Update → Pause updates for a few weeks (it turns back on automatically—not a permanent off).
- [Policy—Pro/Enterprise] gpedit.msc → Computer Configuration → Administrative Templates → Windows Components → Windows Update → Configure Automatic Updates → Disabled; optionally Remove access to use all Windows Update features → Enabled.
- [Services—do several] services.msc as admin—stop and set Disabled: Windows Update (wuauserv), Update Orchestrator Service (UsoSvc), Windows Update Medic Service (WaasMedicSvc); optionally Background Intelligent Transfer Service (BITS).
- [Registry] regedit → HKLM\SOFTWARE\Policies\Microsoft\Windows\WindowsUpdate\AU (create keys if needed)—DWORD NoAutoUpdate = 1; AUOptions = 1 (notify only, no download).
- [Scheduled tasks] Task Scheduler → Task Scheduler Library → Microsoft → Windows → WindowsUpdate—disable the update-related tasks.
- [Delivery Optimization] Settings → Windows Update → Advanced options → Delivery Optimization—turn off downloads from other PCs.
- Note: disabling only one service may be undone by Medic Service or scheduled tasks; a full shutdown like this app needs policy/registry/services/tasks together.
- [Restore] Reverse the steps: re-enable tasks and services, remove or revert registry/policy, cancel pause in Windows Update, then check for updates manually.
- turn off windows update permanently
- Win11 how to stop updates
- stop windows automatic updates
- disable windows update service
- prevent windows from updating
- block windows 11 updates
- pc keeps updating on its own
- windows update keeps restarting pc
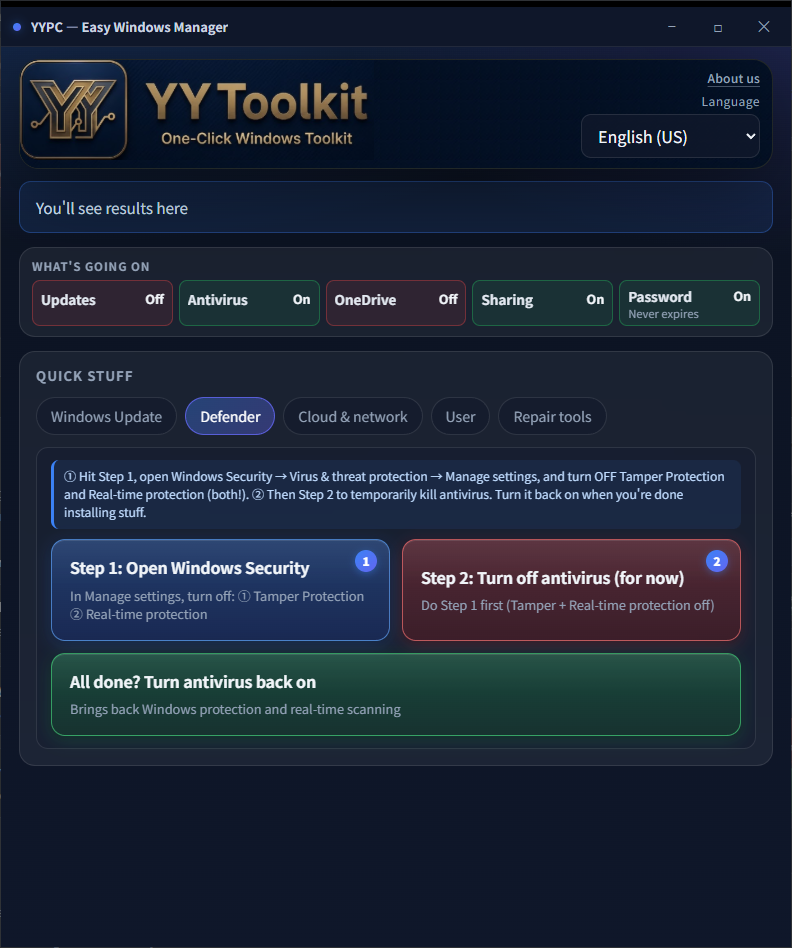
Disable antivirus with one click (Win10/Win11)
Feature guideThe Antivirus tab guides you through turning off Tamper Protection, then fully disables Windows Defender (Windows Security) toggles and background services—not the built-in pause-for-a-few-days mode. Restore anytime. Use only when needed (e.g. installing specific software) and turn protection back on afterward.
What it can do
Open Windows Security
Open Windows Security directly, turn off Tamper Protection and real-time protection on screen, then disable Defender.
Disable antivirus
Fully turns off all protection toggles and background services; stays disabled until you restore.
Restore antivirus protection
Turn Defender and real-time scanning back on—recommended as soon as your install or setup is done.
Use cases
- Installing studio tools that Windows Defender keeps blocking.
- On-site repair: temporarily turn off Windows Security to finish setup, then turn antivirus back on.
- Need Defender fully off (not a few-day pause)—faster than editing services by hand.
How do I permanently disable Windows Defender on Win11/Win10?
With YY-Toolkit: Antivirus tab → follow the guide to turn off Tamper Protection → press Disable antivirus (stays off until you restore). Without this app, follow these manual steps:
Common manual approaches below—screens may differ slightly by Windows version
- Open Windows Security → Virus & threat protection → Manage settings.
- Turn off Tamper Protection first (confirm when prompted; other toggles may stay locked until you do).
- On the same page, turn off every protection toggle: Real-time protection, Cloud-delivered protection, Automatic sample submission, and similar items (names vary by Windows version).
- Those toggles alone may not stop background scans. For a full shutdown like this app: run services.msc as admin, stop and set to Disabled: Microsoft Defender Antivirus Service (WinDefend), Microsoft Defender Antivirus Network Inspection Service (WdNisSvc), and on Windows 11 Microsoft Defender Core Service.
- On Pro/Enterprise, you can also use Group Policy: Computer Configuration → Administrative Templates → Windows Components → Microsoft Defender Antivirus → Turn off Microsoft Defender Antivirus → Enabled (Home editions usually skip this).
- After installing your software, restore in reverse: set services back to Automatic and start them, then re-enable all toggles and Tamper Protection in Windows Security.
- disable windows defender permanently
- disable virus and threat protection
- turn off built-in windows antivirus
- Win11 disable antivirus
- defender turns back on after disable
- disable WinDefend service
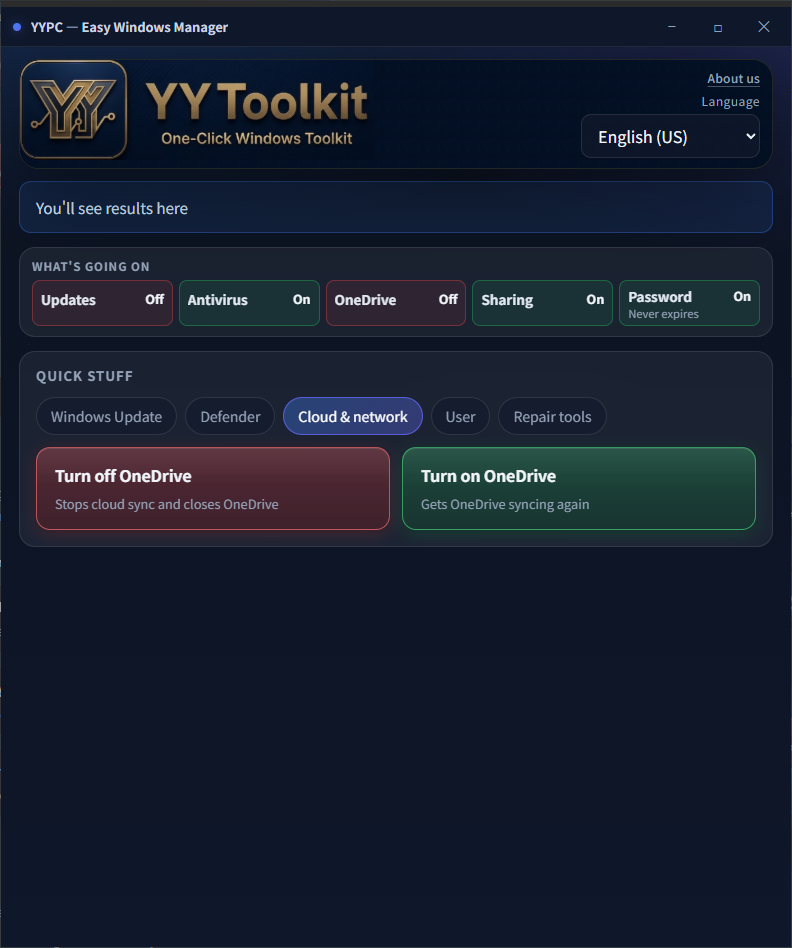
Turn off OneDrive and network sharing with one click (Win10/Win11)
Feature guideSee at a glance whether OneDrive and LAN file sharing are on or off, and switch them directly—no digging through Settings.
What it can do
Close OneDrive
Unlink, uninstall, and stop background and startup so Windows Update is less likely to reinstall OneDrive later.
Open OneDrive
Restore sync and backup when you need cross-device sync again.
Use cases
- You do not use OneDrive and want to stop the background app and sync notifications.
- Check file sharing on your studio LAN before deciding whether to change it.
- Stop OneDrive in the background while editing or gaming to free resources.
How do I completely turn off OneDrive? How do I uninstall and stop startup sync?
With YY-Toolkit: Network & Cloud tab → press Close OneDrive. To adjust LAN file sharing, use the same tab. Without this app, follow these manual steps:
Common manual approaches below—screens may differ slightly by Windows version
- [Full OneDrive shutdown] Click the cloud icon in the taskbar → Settings → Unlink this PC or sign out, and turn off Start OneDrive when I sign in to Windows.
- Uninstall: Settings → Apps → Installed apps → Microsoft OneDrive → Uninstall. (Or run %localappdata%\Microsoft\OneDrive\OneDriveSetup.exe /uninstall)
- Open Task Manager → Startup and make sure Microsoft OneDrive is Disabled.
- Quit or uninstall alone may not stop Windows Update from bringing it back. For a full shutdown like this app: on Pro/Enterprise, use Group Policy → Computer Configuration → Administrative Templates → Windows Components → OneDrive → Prevent the usage of OneDrive for file storage → Enabled.
- On Home editions without Group Policy: run regedit as admin, create DWORD DisableFileSyncNG = 1 under HKEY_LOCAL_MACHINE\SOFTWARE\Policies\Microsoft\Windows\OneDrive (create the keys if missing).
- Restart when done; updates are less likely to reinstall OneDrive or sync in the background.
- To restore: remove the policy/registry value, reinstall OneDrive, and sign in again.
- [Network sharing] Settings → Network & internet → Advanced network settings → Advanced sharing settings → turn File and printer sharing and Network discovery on or off for your profile.
- stop onedrive background sync
- disable onedrive startup
- onedrive keeps coming back
- onedrive using too much disk
- lan file sharing settings
- enable file and printer sharing
- turn off network discovery
- disable onedrive completely
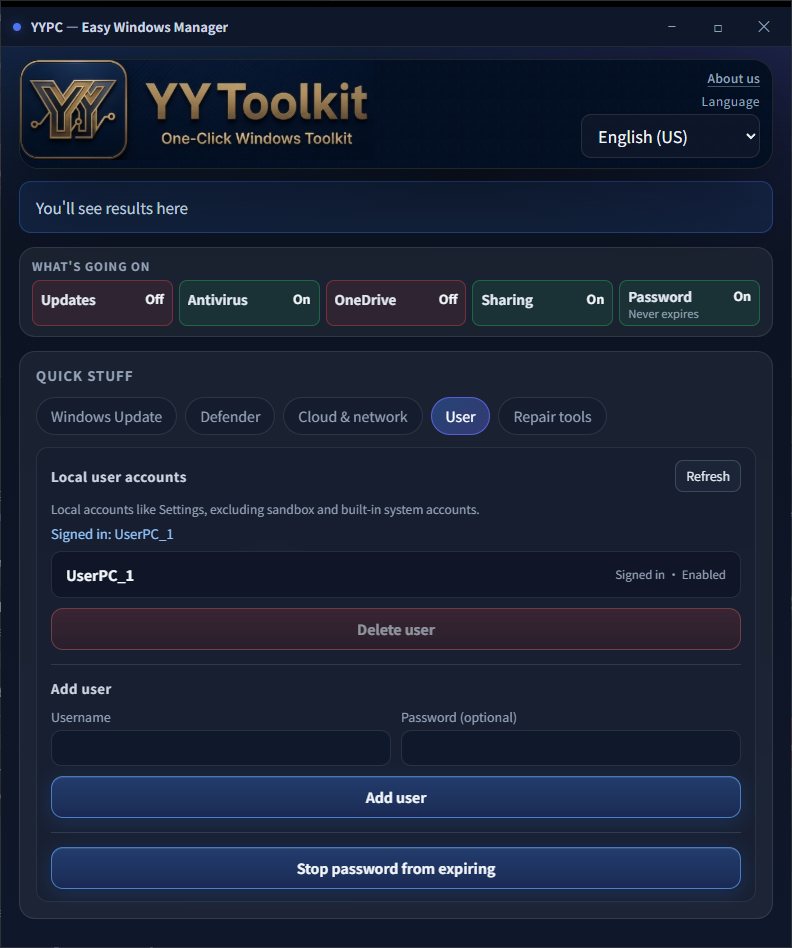
Local users and password never expires (Win10/Win11)
Feature guideOn the Users tab, manage local accounts: add, delete, or set password to never expire—no Control Panel maze or command line.
What it can do
Manage local users
List local accounts (excluding built-in accounts), refresh, or delete selected users.
Add local user
Enter username and password (optional) to create a local user account.
Cancel password expiry
Set password to never expire so you are not asked to change it on a schedule.
Use cases
- Quickly add local user accounts on a shared office PC.
- Remove a former employee’s local account faster than digging through Settings.
- Office PCs that should not nag for password changes every few months.
How do I add a local account on Win11/Win10? How do I set a password to never expire?
With YY-Toolkit: Users tab → add a local account or press Cancel password expiry. Without this app, follow these manual steps:
Common manual approaches below—screens may differ slightly by Windows version
- Add a local account: Settings → Accounts → Other users → Add account → I don’t have this person’s sign-in information → Add a user without a Microsoft account.
- Remove: Settings → Accounts → Other users → select the account → Remove.
- Password never expires: open Command Prompt as admin and run: net user USERNAME /expires:never
- local account without microsoft
- set password to never expire
- stop password expiration prompts
- Win11 add local user
- remove local user account
- local account management
- net user expires never
- sign in without microsoft account
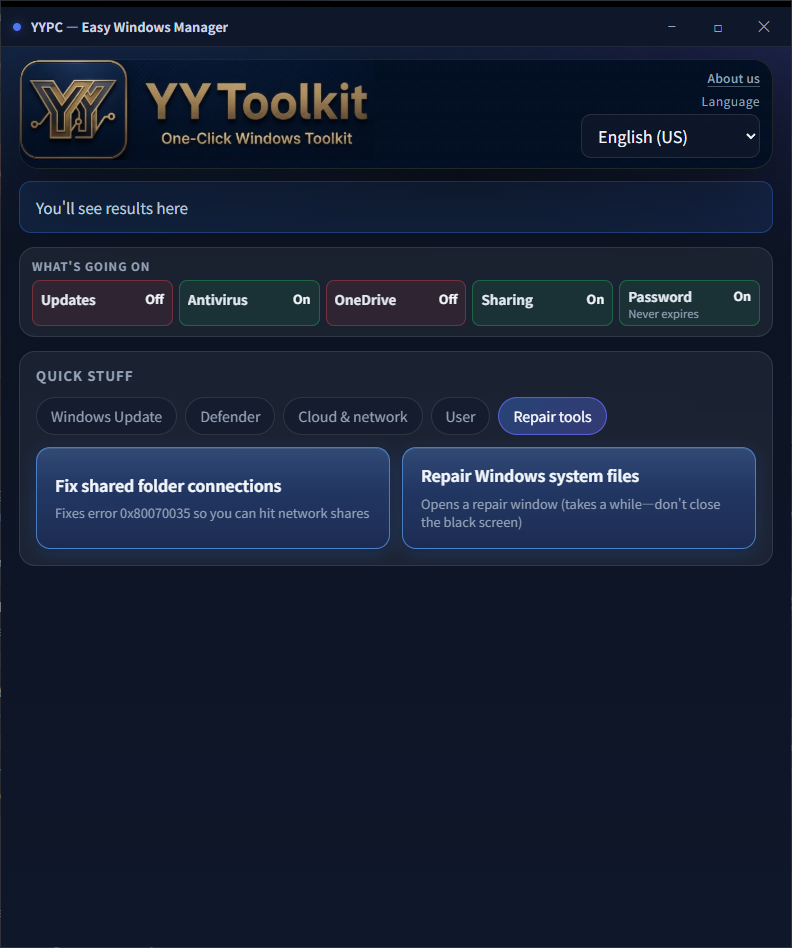
Fix 0x80070035 and SFC/DISM with one click (Win10/Win11)
Feature guideThe Repair Tools tab fixes error 0x80070035 (cannot connect to shared folder) or runs SFC/DISM system file repair. Keep the console window open until finished.
What it can do
Fix 0x80070035 shared folder
Automatically adjusts network discovery, firewall, registry, and services to fix common causes of shared folder connection failures.
SFC/DISM repair system files
Runs SFC/DISM scan and repair for corrupted system files—may take several minutes; keep the window open until done.
Use cases
- Error 0x80070035—studio PCs cannot connect to a shared folder.
- Corrupted system files or random crashes—run SFC/DISM first and see if things improve.
- LAN sharing cannot see other computers—check basic settings first.
How do I fix 0x80070035 network path not found? How do I run SFC/DISM repair?
With YY-Toolkit: Repair Tools tab → fix shared folder access or run SFC/DISM. Without this app, follow these manual repair steps:
Common manual approaches below—screens may differ slightly by Windows version
0x80070035 shared folder error
- [Shared folders—basics] Same network, Private profile; enable Network discovery and File and printer sharing; allow sharing in Windows Firewall.
- Workgroup without passwords: under All networks, turn off Password protected sharing—or sign in with the same local username/password on both PCs.
- For older gear, enable SMB 1.0: Control Panel → Programs → Turn Windows features on or off → SMB 1.0/CIFS File Sharing Support (Win10/11 often still needs the registry steps below).
- [Registry—both PCs] Run regedit as admin → HKLM\SYSTEM\CurrentControlSet\Services\LanmanWorkstation\Parameters: add DWORD AllowInsecureGuestAuth = 1 and RequireSecuritySignature = 0.
- [Registry—host PC] HKLM\SYSTEM\CurrentControlSet\Services\LanmanServer\Parameters: add DWORD RequireSecuritySignature = 0 and EnableSecuritySignature = 0 if missing.
- [Registry—interop] HKLM\SYSTEM\CurrentControlSet\Control\Lsa: set LimitBlankPasswordUse to 0 only if you need blank-password shares (less secure). Restart, then test \\COMPUTERNAME\ShareName.
- Start these services (services.msc): Function Discovery Provider Host, Function Discovery Resource Publication, SSDP Discovery, UPnP Device Host.
SFC / DISM system file repair
- Open Command Prompt as admin, run sfc /scannow, and wait until the scan finishes (can take a long time).
- If SFC cannot fix everything, run DISM first: dism /Online /Cleanup-Image /RestoreHealth, then run sfc /scannow again.
- 0x80070035 error code
- network path not found
- repair corrupted system files
- sfc scannow repair
- dism restorehealth
- shared folder not accessible
- network discovery not showing computers
- smb shared folder error
- win11 system repair command
Requirements
- Windows 10 or Windows 11
- Administrator recommended for some actions
- Internet optional for some status checks
- 20 interface languages supported
Installation
- Download YY-Toolkit.zip and extract it
- Run YY-Toolkit.exe
- If Windows asks for permission, click Yes
- Pick a tab at the top and follow the screen